
The original image of “Arteries of the head” by Sir Charles Bell
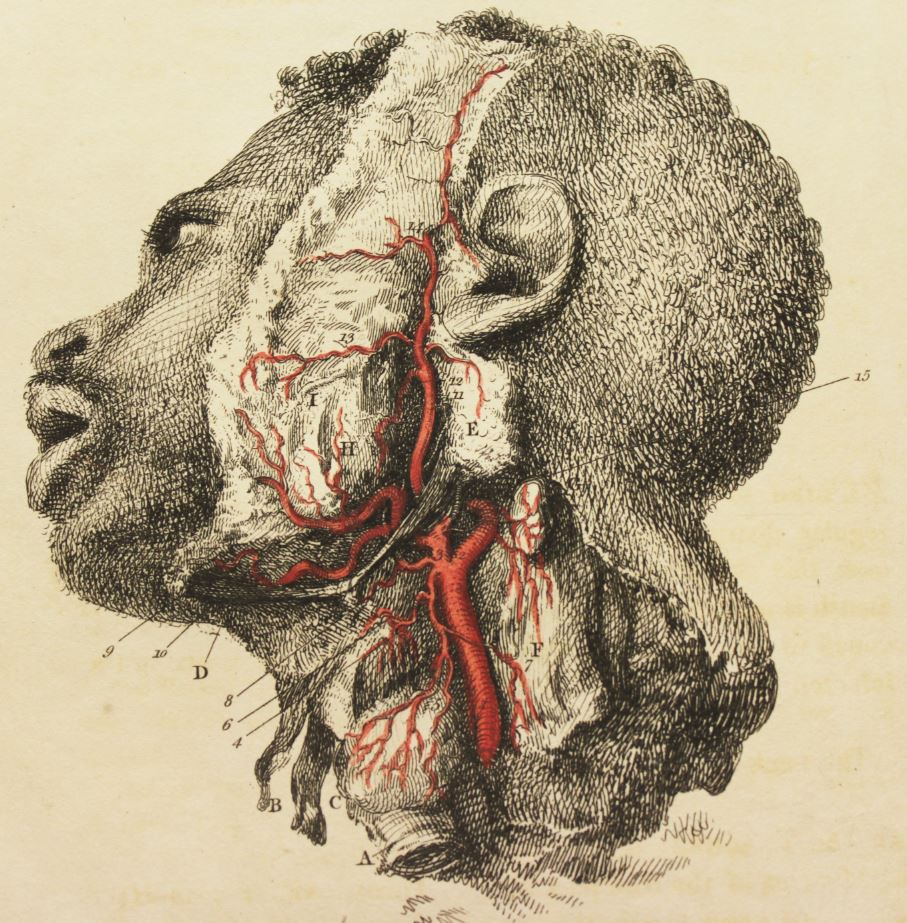
The image I reconstructed was “Arteries of the head” images by Sir Charles Bell, as I found it to be the interesting due to the amount of anatomic detail in addition to the artistic component. Charles Bell’s extensive background in both art and medicine was also fascinating to learn about. This image in particular peaked my curiosity as to who the pictured man is, how his facial arteries ended up being studied by Bell, and if the facial expression has a deeper meaning.
This image was found in Sir Charles Bell’s book Engravings of the arteries…, published in 1824. Since the book was written for teaching purposes to medical students learning about human anatomy, the drawing itself serves the same purpose. Looking at the image in 2022, it is most likely not as impressive and eye-opening as it would have been in 1824 when medical image making was much less advanced and definitely not widespread like it is today.
To reconstruct this image, a combination of thin, dark black markers and red colored pencils are necessary since the etching creates a copious amount of black lines that are mostly very thin. I envisioned the final product to be on quality sketch-pad paper, and being the size of a standard letter paper as I would print out a copy onto computer paper at the library. While running through the process of creating this image in my head I concluded that it would be too difficult to completely hand-draw this illustration thus decided to use tracing paper to copy the outline and major elements.
FIELD NOTE 1 OF 3
Date: 02/16/2022
People Involved: Just me
Location: Fondren first floor “quiet” side
Reconstruction conditions:
- I was in Fondren library on the first floor “quiet side”. I could hear people coming and going occasionally as well as sounds of people, and there were a lot of people studying around me but no one was talking. I could hear the door opening and closing, and the hand dryer of restrooms.
Time and duration of reconstruction: 8:23pm – 9:14pm
Equipment and tools used:
Color printed image, mechanical pencil, eraser, tape, tracing paper, ipad
Subjective factors, e.g., how things smelled/looked/felt:
- At first, I was chewing spearmint gum, that was the only smell I experienced. Fondren was not too quiet or loud, with occasional footsteps and sounds from the bathroom such as the dryer.
Prior knowledge that you have:
- The artist of the original work Sir Charles Bell was an artist and a surgeon. He took art lessons as a child but eventually was trained in medicine. He also had teaching experiences in anatomy and combined his artistic skills with this practice.
- This specific image comes from the published book Engravings of the arteries… ,a 1824 publication illustrated and written by Sir Charles Bell.
Reflection on your practice:
- I used tape to secure the printed image onto the tracing paper.
- A few times, I had to go back and re-trace with darker lines because I realized the graphite might not be dark enough to transfer later.
- In the middle of my process I decided to use my ipad as a light source (displaying a white screen on max brightness setting) to put under the paper so the lines showed up more prominently.
- The paper was not completely flat against the picture so at times the lines did not exactly line up and I had to erase and re-trace when I felt like the lines deviated a lot, but at other times I had to make my best judgement on where I was drawing the lines. The shading method that Bell used with multiple pen strokes made it harder for me to trace the image because there were so many lines to work with that were not very distinguishable under the semi-clear transfer paper.
Photos/video documenting process:

^set-up with the ipad, printed image, and tracing paper

^finished product of this session
Questions that arise:
- Were the rugged lines an active and meaningful experimentation of aesthetics, or simply a representation of the subject’s skin texture, or just a result of the materials/paper he used?
- How detailed should I be and how much am I capable of free-handing later? (I decided to first do the general outline and trace whichever parts stand out as ‘major’ lines)
- Contrasting our modern problem of medical images not being racially diverse enough, this man is Black. What was the relationship of this man and Bell, especially given that slavery was legal during this time? Could he have been an enslaved man?
- What medical state was this man in that his arteries were studied in such detail? Did he undergo any surgeries? Is there an emotion that either the man is expressing or Bell is seeing in the man?
- Tracing the arteries and veins in particular reminded me think about how Bonghan ducts were discovered and how the specific blue dye that Bonghan Kim used was a big deal because it allowed him to visualize the circulatory system otherwise inconspicuous. For Bell, how did he observe these veins so clearly while they are still attached to the man’s head? Are human facial arteries naturally very conspicuous?
- Is this man alive at the time of this sketch? If not, why is his face so vividly included?
- Who is the intended audience of this image? Was this another educationally purposed drawing or a personal artistic expression of Bell?
- Where is the key for the labeled anatomical parts? Are they consistent with modern anatomical definitions?
FIELD NOTE 2 OF 3
Date: 02/17/2022
People Involved: Myself, three friends from my church small group
Location: Fondren study room 601
Reconstruction conditions:
- I reserved a large study room with friends so we could have a study session together except I was reconstructing my image. There was occasional small talk but we mostly focused on our individual work. The room had a lot of white noise from what sound like unknown machinery of the library.
Time and duration of reconstruction: 6:40- 7:30 pm
Equipment and tools used:
Painting paper, Tracing paper, Highlighter for rubbing, Tape
Subjective factors, e.g., how things smelled/looked/felt:
Once I started transferring the outline of the image on the tracing paper onto the real paper, I realized that I got the wrong type of paper. I meant to buy sketching paper that is thick but has a smooth surface, but I bought acrylic painting paper which has a very textured surface that makes sketching with a pencil challenging. Due to this texture, it felt like I had to put in extra effort and force into rubbing the tracing paper with the back of my highlighter so that the graphite lines showed up continually. I considered and briefly tried transferring the traced image onto another piece of computer paper but decided that I wanted the final product to be on more reliable and durable material.
Prior knowledge that you have:
After forming questions from the first session of field notes, I re-visited the blog page where I initially found the image and found the answer to my question, “Who is the intended audience of this image? Was this another educationally purposed drawing or a personal artistic expression of Bell?” which was that it was “Drawn to assist students not only with the study of anatomy but also with the process of dissection.”
A Wikihow article taught me how to use tracing paper to transfer an image by rubbing the back of the transfer paper so that the graphite is copied onto the new piece of paper.
https://www.wikihow.com/Use-Tracing-Paper
Reflection on your practice:
Looking back on how I felt, I realized that the transfer process could have required the same amount of effort and physical strength independent of the type of paper, and my personal disappointment in purchasing the “wrong” paper could have made me feel like I was putting in additional unnecessary effort. This was the first time I handled transferring with tracing paper so I really did not have a standard to compare my experience to.
Photos/video documenting process:

^my set-up while I was transferring the sketch.

^the finished, transferred image (this photo was taken at the beginning of my third reconstruction session)
Questions that arise:
I started to notice the connection/ the flow between different parts of the vein as I paid deeper attention to the vein itself rather than its position
- Could Charles Bell visually observe the arteries thinning out into veins throughout the entire head but omitted them on purpose because he wanted to focus on the larger main arteries or was it hard for him to actually see the rest of the facial veins?
During creating this final draft of the image, I had the picture open on my laptop for reference as I had to free-hand the shading and details that I was not able to copy onto the tracing paper. This led me to take in more anatomical details that are not the main artery system, such as the different protrusions on the lower base of the man’s head that are labeled as “A, B, C”. Noticing how these are distinct anatomical parts made me wonder what they are.
- What was Charles Bell’s process of creating sketches, and how long did each one take for him?
- Did he focus on recreating the exact individual subject’s anatomy into the image or more of an average of all the different bodies he has dissected in the past so that it more accurately represents the general population?
- How did Bell’s focus on the nervous system influence or interact with his understanding and perspective of the circulatory system; was it of secondary importance to him?
- Did Charles Bell believe in phrenology and did it influence the way he saw and analyzed the subject both medically and on a personal level, given that his entire skull is depicted in the illustration?
FIELD NOTE 1 OF 3
Date: 02/18/2022
People Involved: Myself
Location: In my off campus apartment bedroom, at my desk
Reconstruction conditions:
- At first I did not listen to any music as my apartment was completely silent and it was very peaceful. Later into the night (early morning) I had to start listening to loud music to stay alert (specifically Hot Girl Bummer 8D Audio on repeat). Also, the lighting in my room was much more warm-toned than previously in the library which was a nice change.
Time and duration of reconstruction: 1:20am- 3:00am
Equipment and tools used:
- Pigma Micron 005, 02, 08 which is 0.20mm, 0.50mm, 0.30mm each
- Faber-Castell (goldfaber) red colored pencil
- Laptop displaying the original image
- Mechanical pencil
Subjective factors, e.g., how things smelled/looked/felt:
- There was no particular smell but the lighting in my room was much more warm-toned compared to Fondren.
Prior knowledge that you have:
- I was aware of some basic shading principles to follow the natural curve of the anatomical part when shading so that you can tell whether the part is concave or convex and to shade thinly and spread out when the part is lighter and to shade using dense lines when the part has a lot of shadows.
Reflection on your practice:
- This session of recreating the image was the most fun for me because I had the most artistic freedom in having to free-hand all the shading strokes while looking at the inverted image on my laptop screen as a guideline. I felt like I was contributing to my final product the most compared to when I was solely depending on the tracing paper to transfer the image. I had a feeling of accomplishment and adding value through my own “touch” of shading, which made me question if I was truly focused on recreating the image as accurately as possible or if I wanted to create an aesthetic product myself, but I also did focus most on shading the exact same regions as Bell’s original image.
- I first had to use a mechanical pencil to re-outline the transferred lines to make them more clear, and then added more lines of major features that I did not include in the transferring process, all before I started using the pens, which would be permanent.
- I started the shading process by using the 0.5 mm pen and then transitioned into the 0.3 mm and finally the 0.2 mm pens, first shading the darkest regions such as the folds of the ear, the lips, and the eye, and going through the smaller curvatures in the face last. By the time I reached the curvatures, I was in a bit of a rush to finish the product and in hindsight I wish I slowed down a bit more and stepped back to check if the shading was as cohesive the same way Bell’s original image was.
Photos/video documenting process:

^ Reinforcing the transferred lines while using the original image displayed on my laptop as reference.

^ Mid-way through coloring and shading

^Almost done with the shading minus a few details, also pictured are the tools I used.

^ final product
Questions that arise:
- Why/how the middle section that holds the arteries are mostly not shaded in and what the actual color was upon dissection?
- What environment was this drawing created in, and what environment was the actual dissection performed in (if the two were different locations)?
- Would there have been a way to recreate the image without having it being flipped horizontally?
- Does the shading of certain indents not being completely accurate take away from the original image?
- Could this image not only benefit medical students but also artists? What can they learn about expressing emotion or how the body works from this image alone? Can a medical/anatomical image alone speak to artists and teach them new things in this case, and in other cases even if the original creator did not have artists in mind as an audience?
- Was the rest of the man’s body also used for dissection or imaging?
- My friends were intrigued by my recreating of this image and many did not realize that it was for a class until I told them; could this image be viewed as a purely aesthetic image and disregard the medical context entirely? Does it still hold the same amount of value and meaning in that sense as well?
- What were the moral and ethical guidelines for anatomical dissections during the 19th century?
- What are some unseen ways in which medical technology and medicine as a field has advanced due to racism (more micro-scale examples other than the big cases that we often hear about such as the Tuskegee syphilis experiment or Henrietta Lacks)